Eye Makeup to Make Eyes Look Bigger: Technique – Tips & Tricks That Actually Work
Published: 28 Feb 2026
Wanting your eyes to look larger, more open, and more awake is one of the most searched beauty goals for good reason , bigger-looking eyes create an impression of youth, expressiveness, and alertness. The brilliant thing is, achieving this look is entirely possible with the products most people already own. Eye makeup to make eyes look bigger isn’t about piling on product or masking what you have. It’s about understanding where to place light and shadow, which tools to reach for, and how small adjustments to your technique can dramatically shift how your eyes read.
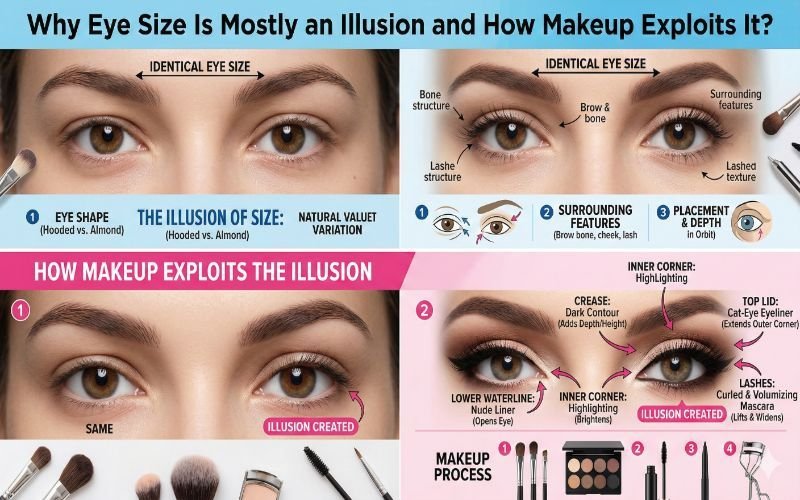
Why Eye Size Is Mostly an Illusion and How Makeup Exploits It
Before jumping into techniques, it helps to understand the visual principle at work. The human eye perceives size based on contrast, light reflection, and framing. Darker areas appear to recede, lighter areas advance, and defined edges create the impression of structure where there might not be any. Every technique covered here works by manipulating one or more of these principles , making the eye appear to open up, lift, or expand without any physical change at all.
This means that the same pair of eyes can look dramatically different depending on liner placement, shadow gradient, and the colors chosen. Understanding the “why” behind each technique makes it easier to adapt these ideas to your own eye shape and skin tone.
The Canvas Matters More Than You Think
A lot of people jump straight into eye makeup without preparing the area, and it shows. Puffiness, dark circles, and dehydrated skin around the eyes all work against the goal of a wide-awake look. Before applying any product, take a moment to prep properly.
Apply a brightening under-eye product or a light concealer to neutralize any darkness beneath the eyes. Dark circles cast shadow under the eyes and make them appear more sunken than they actually are. A well-blended concealer set with a small amount of translucent powder creates a brighter base that makes the whole eye area look more open and lifted , before you’ve applied a single shadow.
- Use an eye primer on the lid to prevent creasing and extend the wear of shadow and liner
- Pat, don’t rub, concealer under the eyes to avoid dragging the delicate skin
- Set the under-eye area with a light-reflecting powder rather than a heavy matte one
The Inner Corner Highlight: One Product-Instant Impact
If there’s a single technique that consistently delivers the most noticeable result for the smallest amount of effort, it’s the inner corner highlight. The inner corner of the eye is one of the key visual anchors that the eye tracks when reading a face , brightening it instantly creates the impression of wider, more open eyes.
Use a small flat brush or your fingertip to press a shimmery champagne, white gold, or pale pink shadow into the very inner corner of the eye. You can also use a white or gold eyeliner pencil for precision. The light-reflecting pigment draws the eye inward and creates a sense of width across the entire eye area. For extra effect, tap a tiny amount onto the center of the lower waterline as well , it ties the whole look together and makes the whites of your eyes appear brighter.
Eyeshadow Placement: Light in the Center-Depth on the Edges
How you distribute shadow across the lid is one of the most powerful tools for controlling the perceived size and shape of your eyes. The principle is straightforward: light shades advance, dark shades recede. Placing darker shades at the outer corners and crease while keeping the center of the lid light creates a rounded, open shape that reads as larger.
Start with a light or shimmery base across the entire lid. Then apply a slightly deeper matte shade into the crease to add dimension , this creates the impression of depth, which paradoxically makes the eye appear larger. Finally, focus any darker shadow at the outer V only, fading it toward the crease rather than dragging it all the way across the lid.
- Lid: Light shimmer or satin shade , champagne, nude, soft pink, or peachy gold
- Crease: Matte medium tone , taupe, soft brown, or warm mauve
- Outer V: Deeper matte shade for definition without closing the eye
- Inner corner: Shimmery highlight to open the eye and add brightness
Avoid applying dark shadow across the entire lid from inner to outer corner , this is the single most common mistake and the one most likely to make the eyes look smaller rather than larger.
Shimmer vs Matte: Why Finish Matters for Eye Size
Eyeshadow finish is a detail that’s often overlooked, but it plays a significant role in how large the eye appears. Shimmer and satin finishes reflect light, which makes the area where they’re applied appear larger and more prominent. Matte finishes absorb light and tend to add depth , useful in the crease and outer corner, but counterproductive on the main lid if your goal is to open the eye up.
This doesn’t mean avoiding matte shadows entirely , they’re essential for creating dimension and preventing the look from appearing flat. The key is understanding where each finish belongs. Shimmer on the lid, matte in the crease and outer corner. This gradient of reflection to absorption creates a rounded, three-dimensional eye effect that reads as significantly larger than a flat, fully matte look.
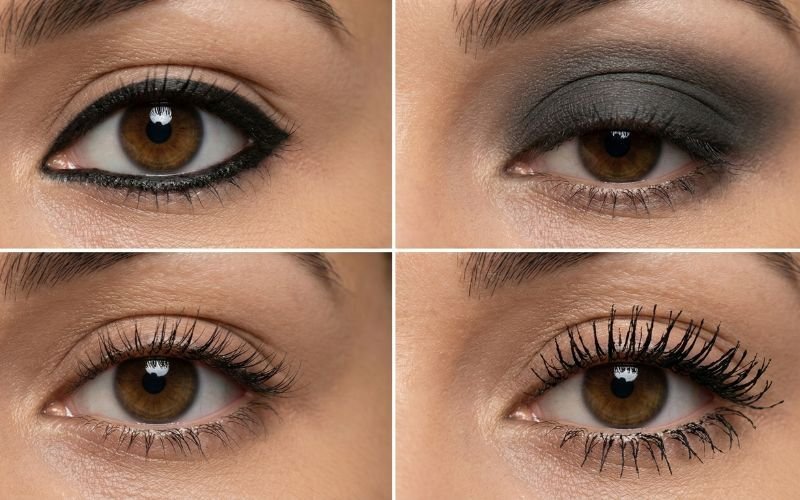
Eyeliner for Bigger Eyes: Less Is Often More
Liner is where the most mistakes happen when trying to make eyes look bigger. The instinct is to define the eye heavily with a thick black line , but this approach tends to close the eye off rather than open it up. Strategic, minimal liner placement is far more effective.
Tightlining , drawing liner directly into the upper lash line rather than on top of it , is one of the most flattering techniques. It creates the appearance of fuller, darker lashes without any visible liner, which adds definition without using up any lid space. For daytime, tightlining alone combined with mascara can be all the liner you need.
For a more defined look, apply liner only to the outer two-thirds or three-quarters of the upper lash line. Starting liner from the inner corner immediately makes the eye appear shorter and narrower, while beginning from the middle and building outward elongates the shape and creates a more open effect.
The Waterline Game-Changer: White or Nude Liner
Lining the lower waterline with a dark pencil is a classic technique for adding drama , but it directly reduces the apparent size of the eye by making it appear smaller and more closed. For anyone focused on making their eyes look bigger, switching to a nude or white eyeliner on the lower waterline is one of the most impactful changes you can make.
A nude or white waterline pencil blends with the whites of the eyes, creating the visual impression that the eye is larger and the whites are brighter. It’s a subtle change in isolation but genuinely noticeable in combination with the other techniques here. For daytime, a nude liner on the lower waterline paired with the inner corner highlight creates an effortlessly wide-eyed effect that looks natural rather than overdone.
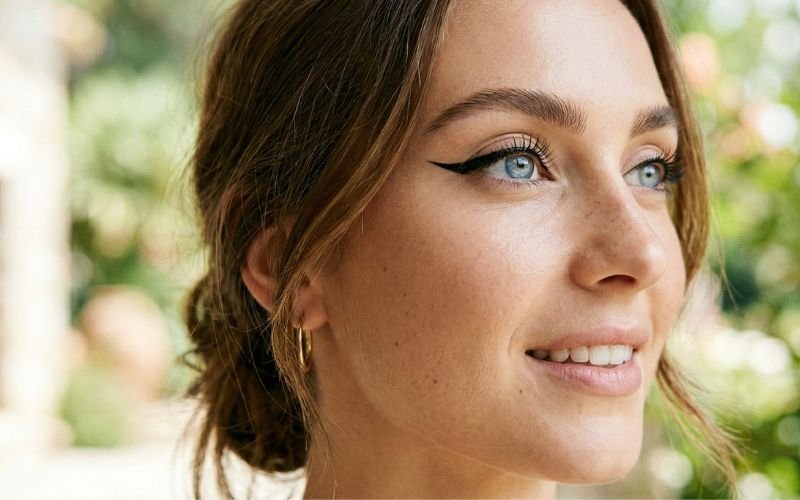
Winged Liner: The Lift That Opens the Eye
A well-placed wing does two things for eye size simultaneously , it elongates the eye shape and creates an upward lift that makes the eyes appear more open. The key word here is “well-placed.” A wing that extends too horizontally can drag the eye down, having the opposite effect of what you want.
Keep the wing angled upward rather than straight out, following the natural angle from the lower lash line up toward the tail of the brow. A short, precise flick is more effective than a long, dramatic extension for the purpose of opening the eye. Use a waterproof liquid or gel liner for precision and staying power, and keep the line thin at the inner portion of the lid, thickening only slightly at the outer corner.
Mascara: The Non-Negotiable Eye Opener
Few products do as much for eye size as a good mascara applied with the right technique. Curling your lashes before mascara is essential , it lifts the lash line, creates space between the lash and the hood, and makes the eye appear immediately more open. Hold the curler at the base of the lashes for a full 10 seconds before sweeping gently toward the tips for a natural, wide curve rather than a sharp bend.
For mascara application, wiggle the wand at the lash root before sweeping upward to build maximum volume at the base. Apply extra coats to the outer lashes to create a fanning effect , this elongates the eye shape and draws it outward, creating the appearance of width. Apply a light coat to lower lashes as well, but keep it subtle on the inner portion to avoid making the eyes appear smaller or more closed.
- Use a lengthening formula on upper lashes for extension
- Add a volumizing coat on top for fullness
- Apply brown mascara instead of black for a softer daytime effect
- Focus outer lashes for a widening, cat-eye inspired result
False Lashes: Maximum Impact for Special Occasions
For events where you want the most dramatic eye-opening effect possible, false lashes can genuinely transform the look. The style of lash matters enormously here , lashes that are longer in the center create a doll-eye effect, which maximizes the appearance of roundness and size. Lashes that are longer at the outer corners create more of a feline, elongated effect.
Individual clusters or half-lashes applied from the center to the outer corner are an excellent option for beginners or those who find full strips difficult; they add impact at the most visible point of the eye without the fuss of a full strip application. Look for natural-density styles in the 10–12mm range, which add noticeable length without appearing costume-like.
Brows: The Overlooked Frame for Bigger-Looking Eyes
The eyebrows frame the eye, and their shape directly influences how large or open the eye appears. Brows that are too flat tend to push down on the eye area, making it look smaller. A slight arch, positioned above the center to the outer third of the brow, lifts the eye area visually and creates more perceived space between the lid and the brow.
Keeping the inner third of the brow natural and soft , heavy, squared-off inner brows reduce the visual width between the eyes and make the eye area appear more compressed. A well-groomed, naturally arched brow with a clean underside creates the most eye-opening frame. Fill any gaps with light, hair-like strokes using a fine pencil or brow powder, and set with a clear or tinted brow gel to finish.
Adapting These Techniques to Different Eye Shapes
Not all eyes respond identically to these techniques, and understanding your eye shape helps you refine the approach for the best result.
For hooded eyes, blending shadow above the natural crease is crucial for visibility, and keeping liner minimal on the inner lid avoids closing the eye off further. For round eyes, focusing darker shadow and liner at the outer corners elongates the shape rather than emphasizing roundness. For downturned eyes, applying liner with a slight upward flick at the outer corner and keeping the outer shadow lifted rather than draped counteracts the downward angle. For close-set eyes, keeping the inner corner light and focusing depth at the outer edge creates the illusion of more space between the eyes , which in turn makes them appear wider and larger.
A Quick Everyday Routine: Five Minutes to Bigger Eyes
Not every day has time for a full routine, and the good news is that even a stripped-back version of these techniques delivers a noticeable result. Here’s a streamlined everyday approach that takes under five minutes and uses just four products.
Start with a skin-toned matte base across the lid to set primer and even the surface. Sweep a shimmery champagne or nude shadow over the lid and tap a brighter highlight into the inner corner. Apply nude or white liner to the lower waterline. Curl lashes and apply two coats of lengthening mascara, concentrating on the outer lashes. That’s it , and it works because it covers the three most impactful techniques: inner corner brightening, waterline lightening, and lash opening.
Mistakes to Avoid
Even with the best intentions, a few habits consistently undermine the goal of bigger-looking eyes. Knowing what not to do saves a lot of frustration.
- Applying thick black liner across the entire upper and lower lash line simultaneously closes the eye
- Using dark shadow across the full lid with no light center removes depth and dimension
- Skipping the inner corner highlight leaves out one of the highest-impact techniques
- Neglecting brow grooming leaves the frame of the eye looking undefined
- Applying mascara without curling misses the biggest source of eye-opening lift
Final Thoughts
Making eyes look bigger with makeup is less about product quantity and more about technique precision. The light-to-dark gradient, the strategic liner placement, the waterline choice, the lash curl , each of these individually makes a difference, and together they create a genuinely transformative effect. Once these principles become a habit, the whole routine becomes faster, more intuitive, and consistently flattering regardless of your natural eye shape or size.


- Be Respectful
- Stay Relevant
- Stay Positive
- True Feedback
- Encourage Discussion
- Avoid Spamming
- No Fake News
- Don't Copy-Paste
- No Personal Attacks
- Be Respectful
- Stay Relevant
- Stay Positive
- True Feedback
- Encourage Discussion
- Avoid Spamming
- No Fake News
- Don't Copy-Paste
- No Personal Attacks
